Denver: Join Us in Voting Yes on 2O
By Heather Lafferty and Stefka Fanchi This April 4th, if Denver voters say vote yes on Ballot Measure 2O, Habitat for Humanity of Metro Denver and Elevation

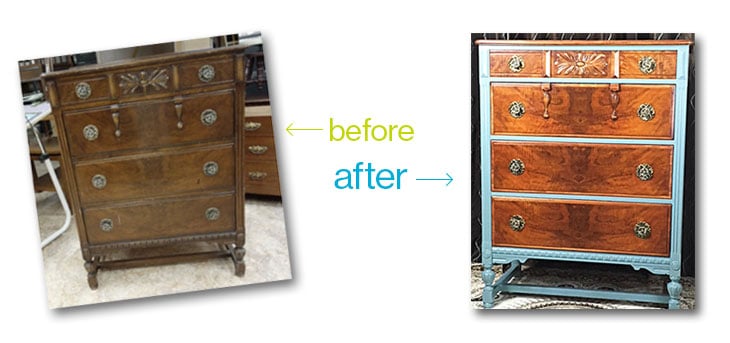
Want to see some furniture magic? See how one ReStore customer took an old dresser and turned it into an updated piece! Follow along, and you can make your own furniture magic too.
Getting Started!
The dresser was solid wood, with beautiful burled veneer. The client for this piece decided to do some restoration on the dresser to bring out the beautiful wood-grain and to paint the the sides and drawer trim to update the color.
These are the supplies for this project:
DIY Tip: Follow the directions on all products you use when stripping, staining and painting. Some of these contain chemicals that can be harmful if exposed to or inhaled. Be sure to protect your hands with lightweight latex gloves.
Pre-Step 1) Staring at furniture
You want to be a furniture magician. An ability to stare at furniture for a long time is required. Why? Because, the furniture will begin to talk to you about the best way to finish it. It will pay off for you to listen. Furniture has history, architecture and an artistic sensibility. You have to stare at furniture to figure out what to do. Enough said.
Step 1) Clean thoroughly & strip the areas of the piece that you will refinish instead of paint.
Clean all furniture you will be stripping or painting to take off any dirt or residue. Warm water mixed with a de-greaser like DAWN is great for furniture that is in not-so-pristine shape.
DIY Tip: Furniture must be dry before painting or stripping. In Colorado, this is not a problem and most furniture will dry after cleaning in a matter of hours.
Strip the old finish — Apply a generous amount of stripper on the area being stripped.
Remove the old finish – Wait at least 15 – 20 minutes but don’t allow the stripper to dry out. Using a metal or plastic scraping took, work the stripper and finish off the furniture. DIY Tip: You will want lots of paper towels and a waste basket handy for this. It’s MESSY!
Mineral Spirits: Your furniture refinishing friend – Once the finish is completely removed and the wood is exposed, using a clean rag, wipe down with mineral spirits. This will clean the wood area and also give you an idea of what the piece will look like when completed.
Step 2) Getting a professional stained & painted finish
Staining the furniture – I wanted this dresser to have a deep color but lighter than the original finish. You can use traditional stain that penetrates the wood or a gel-stain for an easier staining process. This dresser was stained with gel-stain in red cedar. After applying stain, lightly sand with high-grit sandpaper and apply a second coat of stain. Letting the stain sit on the furniture deepens the color. Buffing the gel-stain once it is partially dry can even out the stain and help it ‘set’ into the wood.
Painting the furniture – My preference is for very high quality paint and paint brushes. The tools you use will greatly contribute to the finished product. Both the dresser and the side-table were painted in a light blue-gray paint from Ralph Lauren. I usually apply 2 light coats of paint, sanding very gently between layers and a 3rd finish top-coat of paint.
DIY Tip: Work in really good lighting so you can truly see what you’re doing when painting. It will lessen mistakes and give you a better finished product.
Step 3) Protect
Apply Polycrylic to protect – The last step is to protect the furniture with a polycrylic application. This helps the pieces sustain their finish through regular usage. I use a water-based poly and apply it with cheesecloth that is folded to hide the raw edges. 3 coats will do nicely. Be sure to wait the recommended wait time between layers of poly and sand very, very lightly with 400 grit sand-paper between applications.
Can’t get enough? See other ReStore DIY furniture projects here.
Step 4) Were you successful?
The answer to this question is always yes. It takes some guts to take on a project like this. Bent Woods Studio has refinished and painted over 100 pieces of furniture and I’m still learning. Also, I have gone back and redone pieces that did not quite work. This is expected and part of every furniture artist’s learning curve.
Congratulations on your DIY prowess!
Do you have an old, outdated piece of furniture? Or do you have a desire to DIY? Remember to shop the Habitat Denver ReStores first (or if you’re elsewhere in the nation, click here) and let us know of your projects for a chance to be featured on the ReStores social media and blog!